SystemRescueCd is a Linux rescue disk you can use when your system fails and needs to be restarted. First, transfer the image to a flash drive or another storage device. Then boot from it to acquire a complete range of administrative and data recovery tools. You can create, edit, and restore partitions on the disk. If you are interested, you may get SystemRescueCd for free below.
The image already includes several useful features, such as disk utilities, basic network tools, text editors, and more. It works with both Linux and Windows.
As you might expect, installation is not necessary; simply put it on a flash drive or disk and boot from it. You can install it on a hard disk if you like, but you’ll get a new kernel, and your hardware will be detected correctly. File system support is broad, supporting all standard file systems, including ReiserFS and VFAT. Network file systems are also supported.
Overall, it’s a lifesaver, especially when the main system refuses to boot. Keep it on a flash drive; it will undoubtedly come in handy someday, though I hope not. This is an excellent product for anyone who works with different operating systems or routinely repairs other people’s computers; I strongly suggest it to everyone.
Features:
- Functional live Linux system in ISO format.
- Allows you to work on broken systems and retrieve data after a failure.
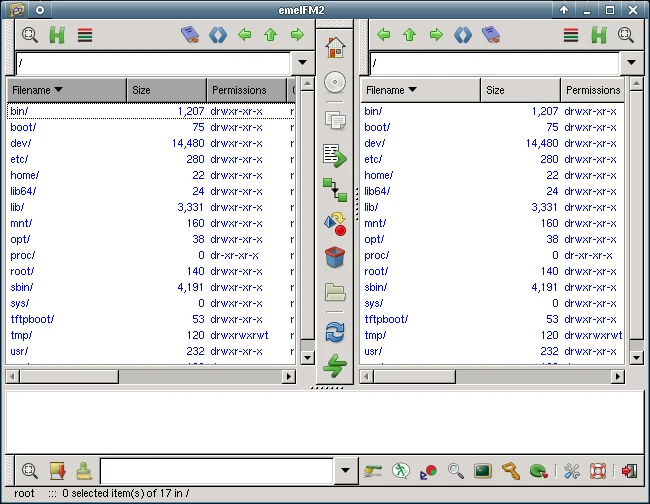
- After accessing the shell, you will be able to use a variety of specialist tools, including file managers, disk management, error detection, and so on.
- Sections can be created and modified.
- This entire project is based on Arch Linux; here’s an active link for those interested.
To use this great rescue disk and avoid data loss, first create a bootable USB drive. After downloading the ISO image from the link provided below, you will require tools such as UltraISO or Rufus. These utilities will burn the entire disk to a USB device, allowing you to boot the system from it rather than the hard drive. To do this, open the Boot Menu (also known as the boot menu) and pick the USB device you’ll be using.